The inexpensive "blade designer program" is available for purchase from
The Blade Designer program was written by Ed Lenz.
This basic tutorial is written by Fred Tonch on May 28 2003 from http://www.internetfred.com
 Table of contents: Table of contents:
- introduction
- hints
- the program input parameters
- adjusting the ratios (added features)
- all adjustments and effects list
- estimated propeller performance and calculated generator performance
- using the tables to produce a propeller (optimizing the design)
- blade terminology
- building with the design and building the blade
- credits
Introduction
About a year and a half ago, I began the daunting task of wanting to create a wind
turbine for the sole purpose of producing power. I quickly found out this year that a
basic understanding of aerodynamics is a requirement if your intention like mine, is to
build and design such a device. Without the proper propeller matched to the generator, the
power achieved will be substantially lower then with a matched propeller. The generator
and propeller go hand in hand.
I am writing this basic help tutorial from the standpoint of a beginner wind turbine
builder. I also suggest purchasing "Windpower Workshop" from Hugh Piggott also
available from windstuffnow, as it has the basic essentials and guidelines necessary to
building a wind turbine. The book has fairly extensive information regarding blade design
and parameters required in design of a turbine. Only the basics will be covered in this
help document.
The blade designer program has many added features which are not apparent at first
glance. Armed with the book and this program, basically any small wind turbine and
blade can be designed, built and matched to produce maximum output.
For all types of metric and standard number conversions, use the free program available
for download called win-convert express.
This is a simple zip file. Note: if you are using win95/98 then you must download visual
basic 6 runtime if you do not have it installed already or the converter will not
work. This program is called VBRun60.exe. Do a search on www.google.com
to find it.
Hints:
In this help document I use the words "blade" to mean a single blade and the
"propeller" a unit composed of individual blades and a hub connected together as
a single unit. Making blades into a propeller is a replication process. Many blades can be
produced at once with this program and assembled into a propeller. Also note that
some people call the propeller a rotor. Actually the a rotor is a part of the generator,
hub housing and spindle assembly, but anything that rotates can be considered a rotor so
it's ok to use the term rotor in use of propeller or it's short form "prop".
In the program the highlighted areas marked in a darker gray color are for inputting
parameter variables or values used to design a blade. A calculated value located in a
table is not changeable except by the adjustment menus. All adjustments and effects where
found by adjusting with each input and watching the result or effect. It is highly
suggested that you do this also, since it will tell you how the program functions and
calculates.
The
Program Input Parameters

This is the basic area for inputting parameters to create the blade. This is the first
menu that will be discussed into it's simpler parts below.
 | Rotor diameter in meters - the total diameter of the propeller. Here are some
standard numbers. To find rotor size in meters you can convert ft to meters by multiplying
ft x .3048 |
| The Diameter is two times the distance from the center of the hub to the tip of the
blade. It also can be looked at as the distance across the circle that the propeller would
make when rotating. This is also know as the total swept area. |

Standard Meters to Feet |
| .04 m = 0.131 ft |
| .08 m = 0.262 ft |
| .5 m = 1.46 ft |
| 1 m = 3.28 ft |
| 1.5 m= 4.92 ft |
| 2 m = 6.56 ft |
| 2.5 m= 8.20 ft |
| 3 m = 9.843 ft |
| 3.5 m = 11.48 ft |
| 4 m = 13.12 ft |
| 4.5 m = 14.76 ft |
| 5 m = 16.40 ft |
| Tip Speed Ratio (tsr)- How many times faster then the wind speed, the blade tip
is designed to run. The tip of a blade can travel faster then the wind. The tip speed
"ratio" is the optimum between stall and runaway. Typical tip speed ratios are 1
thru 10. Tip Speed Ratio (tsr) = (tip speed of blade) / (wind speed). |
| Notes: Rotors are designed to run best at a particular 'tip speed ratio', but in
reality they run at a speed which also depends how they are loaded. If the generator draws
more power than the rotor has to offer then it slows, and often stalls. |

| Number of blades- 3 blades is most preferred and most often used. 2
blades produces noise, rattle, imbalance, harder to start in low winds and other
problems (tsr>4). (check out http://www.windmission.dk
for multi bladed designs (tsr<2) at lower wind speeds) |
| |
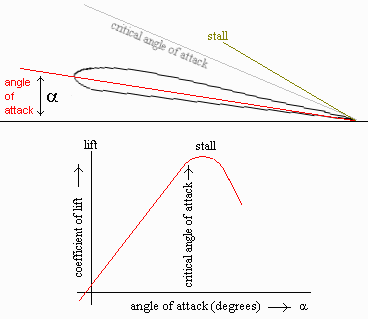
| Angle of attack.- in degrees. This is the propeller efficiency. 4 degrees is
standard. Numbers here can range from 1 deg to 15 deg typical. The angle between the chord
line of the airfoil and the flight direction is called the angle of attack. Angle of
attack has a large effect on the lift generated by an airfoil. |
| Lift Coefficient - the lift coefficient is approximately two times pi (3.14159)
times the angle of attack expressed in radians. Standard setting =.8
Typical numbers range from .8 to 1.25 |
| Number of stations - This is used to create the blade on a piece of wood. The
stations are markings spaced at intervals. |

| Overall Efficiency - Overall efficiency is basically the power you will get out
of the generator. |
Mechanical losses in the propeller, hub and spindle and electrical and magnetic losses
such as usage of iron and wire resistance in the generator effect overall efficiency. All
of this is calculated and included in the overall efficiency of the generator.
Typically on a propeller type it ranges from 25-35% overall and on Savinous type about
15%. So if you have a prop making say 45% efficient use converting wind into power and an
alternator that is 75% efficient then
the over all efficiency would be about 33% ( .45 x .75 = .3375). This doesn't include any
transmission line losses though.
Adjusting
the ratio's (added features)

Adjusting the above calculated values for generator performance.

This menu is for adjusting the calculated generator performance values.
| The Recommended Ratio - This number is a calculated value ratio of all factors of wind
speed. |
| The User Ratio - This number is an input option, the user ratio is used to adjust the
"Watts at recorded ratio" |
| The Open Voltage is the open voltage from either a "to be built" or
"already built" generator |
| The Ohms is the total ohms from either a "to be built" or "already
built" generator |
| The Regulated Voltage measured in DC is the voltage from either a "to be
built" or "already built" generator |

This menu allows you to input the wind velocity and adjusts the following calculations.
All
Adjustments and Effects List
| Adjusting the rotor diameter effects all numbers in all the tables calculated. |
| Adjusting the tip speed ratio effects the stations ratios, estimated propeller
performance rpm, calculated performance generator - ratio; and calculated
performance generator -watts recorded ratio. |
| Adjusting the number of blades effects the stations ratios -cord, thickness and drop. |
| Adjusting the angle of attack effects the stations ratios - Bld angle (blade angle) |
| Adjusting the lift coefficient effects the stations ratios - cord, thickness and drop. |
| Adjusting the number of stations effects the stations ratios - station number |
| Adjusting the overall efficiency effects the estimated propeller performance -watts
& rpm, all calculated performance generator variables and the recommended ratio. |
| Adjusting the user ratio effects the calculated generator performance -watts recorded
ratio |
| Adjusting the open voltage effects the calculated generator performance - rpm,
ratio & watts recorded ratio |
| Adjusting the measured rpm effects the calculated generator performance - rpm, ratio
& watts recorded ratio |
| Adjusting the measured ohms effects the calculated generator performance - rpm, ratio
& watts recorded ratio and the open voltage |
| Adjusting the regulated voltage effects all calculated generator performance variables |
| Adjusting the wind velocity effects the rotor thrust in pounds |
| Adjusting the rotor diameter adjusts the rotor thrust, rotor offset and tail size. |
Estimated
Propeller Performance and Calculated Generator Performance
The next menu is the calculated "estimated prop performance and the calculated
generator performance". These numbers are not input variables, they are calculated
from the above input parameters.

Estimated Propeller performance
| The estimated propeller performance numbers given in watts and rpm is the amount of
power that can be achieved by the propeller doing work. |
The Calculated generator performance
| Amps - How much amperage can the generator deliver |
| Open Voltage - how much voltage can the generator deliver without a load connected |
| Rpm - this is the calculated speed in revolutions per minute of the generator rotor. |
| Ratio - This is a calculated drive ratio. If your going to use a belt or chain drive
instead of direct drive. This example picture above shows almost a 3 to 1 drive or
basically running the alternator 3x faster than the prop rpm. What it does is figures out
the best possible match for each wind speed then averages it out in the bottom as the
recommended ratio. Or you can simply click on the user ratio button and put your number
in. Direct drive would be 1 or any other ratio and the watts will show what the unit would
do with that ratio. |
| Watts Recorded Ratio - This is the generator performance ratio for watts. This
ratio reflects the alternator speed in relation to the blade speed. In the program when
the user ratio is clicked the recommended ratio is no longer of any use. "watts
recorded ratio" is actually "recommended" ratio. |
Using
the tables to produce a blade
(optimizing the design)
I have asked Ed to give a brief note on using the program to create a blade. Ed will
now describe the principles behind optimizing the blade design and what to look for.
In the break down of data tables, the perfect blade would reflect the watts from the prop
and the watts in the generator to match perfectly. For instance if the blade is making 100
watts and the generator is making 100 watts that's a perfect match. Unfortunately this is
very unlikely. We have to deal with a wide range of rpm's and there is always an imbalance
somewhere in the range.

You have to design the blade to work within the average wind speed of your area. So if
your area was in the 10-20 mph wind range you would try to match the prop and generator to
that wind speed as best as possible. If the prop watts are lower than the generator watts
the blade will stall and never reach its designed TSR and ultimately never reach its power
at that speed. If the prop watts are higher than the generator then the blade will start
to spin faster to meet the generator load. This is the optimum, where the the generator
and the prop meet.

There is a point where the prop will "run away" from the
generator. This means the load provided by the generator isn't enough to keep the blades
at their optimum designed speed.
This can cause a couple problems...
The prop is now running beyond the TSR it was designed for and can cause
blade erosion, where the leading edge close to the tips and the tips of the blades will
start pitting and cracking... especially in rain or adverse weather.
Since the blade is producing more power than the generator, the
generator is trying to produce more than it can... this causes heat which ultimately will
burn up the windings and possibly ruin a good set of magnets.
If we keep them matched as close as possible the load will control the
prop speed and all is well. Usually, where the prop starts to run away from the generator
is where its best to start furling the blade. The cause of this imbalance is because the
power coming through the prop is cubed and the generator output is linear.
So its a give and take situation... either give up the low end or give up
the high end.
Blade
Terminology


Camber is often used but misunderstood. Defined as curvature in the mean
thickness line of the blade section.

Building
the blade

This table is composed of the following:
| The station number - stations are markings spaced at intervals. |
| The Radius in inch's - The radius of the blade at each station. Section length is the
same as blade width. Each station is expressed as a percent of radius increment ( i.e.: 40
radius is 40% of the blade radius) . |
| The Blade Angle in degrees - Basically the angle of that portion of the blade when its
carved. This is the angle of the blade based on the "drop" and "chord
width" |
| The Chord in inch's - This is the chord width |
| The Thickness in inch's |
| The Drop in inch's |
This is the calculated station numbers used to produce the blade as follows
| Please Note: At this point it is highly suggested that you consult the windpower
workshop book for greater detail into the building of the blade. This is only a very basic
layout.
|
| A blade is thickest at the root for structural integrity
tip
|
| Mark out the stations, draw the lines completely around the material |

| Taper the blade - mark the width out and cut out parts marked |

| Mark the drop of each station |

| After carving it looks like this |
| Next measure the thickness of each station on both sides and remove the material from
the other side |

| A cross section of the blade |

| Another cross section of the blade |
I wish you good luck on your project and please send me pictures and web links of your
latest projects!
www.internetfred.com
Credits
I would like to thank the following people that contribute their talents, inspiration
and knowledge each day!
THANK YOU ALL FOR THE FANTASTIC WORK, WEB PAGES AND IDEAS!
Hugh Piggott http://www.scoraigwind.com/
Dan B and Dan F - http://www.otherpower.com/
JK TAS Jerry http://www.dplusv.com/Photo-03.html
|